
Introduction
This is the third part in a series about using a Pi Hole as a Cyber Security tool. My previous articles are available and easy to access. Click here for the original LinkedIn article.
Methodology
- Install Pi Hole on Raspberry Pi
- Create Ubuntu Server in Cloud
- Install Splunk on Ubuntu Server.
- Install Splunk Universal Forwarder on Raspberry Pi.
- Accessing Splunk Pi Hole App.
Create an Ubuntu Server in the Cloud
Splunk can run on multiple platforms but in this instance I felt comfortable using an Ubuntu Server variant in the cloud.
What is Splunk?
“Splunk is a software platform to search, analyse and visualise the machine-generated data gathered from the websites, applications, sensors, devices etc. which make up your IT infrastructure and business.”
There is a Pi Hole app that runs on Splunk that receives data from a specific Pi Hole, ingests it and visualises the data.
Creating an Ubuntu Server in the Cloud
Sign on for an account at: https://www.digitalocean.com/ a cloud service provider
When you login this screen will greet you:

To create a new server click on the ‘droplets’ tab:

Choose the following options:
- Ubuntu 20.0.4.
- Shared CPU Plan.
- Regular Intel with SSD.
- The $20 a month plan.
- Manually format and mount.
- Choose the Singapore Region.
- Password authentication chosen.
- Tick ‘enable backups’
- A new Ubuntu Virtual Machine will be created for you. Take note of the IP address as it will be needed later.

Regional options:

INSTALLING SPLUNK ON UBUNTU 20.04.3

First change directory to /opt/
cd /opt/

Using the wget command copied from the Splunk Website:

This was accurate as of the time of the original posting (December 2021). In subsequent implementations of the server I have found that the version of Splunk Server has changed along with the command.
Copy the command:
wget -O splunk-8.2.3-cd0848707637-Linux-x86_64.tgz ‘https://download.splunk.com/products/splunk/releases/8.2.3/linux/splunk-8.2.3-cd0848707637-Linux-x86_64.tgz’
Which looks like this:

Using the following command unzip the file:
tar zxvf splunk-8.2.3-cd0848707637-Linux-x86_64.tgz

Change directory to splunk/bin
Start the Splunk Server: sudo ./splunk start

Once started: go to the (IP address of server):port 8000 or simply (example) 101.168.1.101:8000
Login with your registered credentials.
Browse the Splunk App store for the Pi Hole DNS App and Pi-Hole Add-On for Splunk:

Install both.
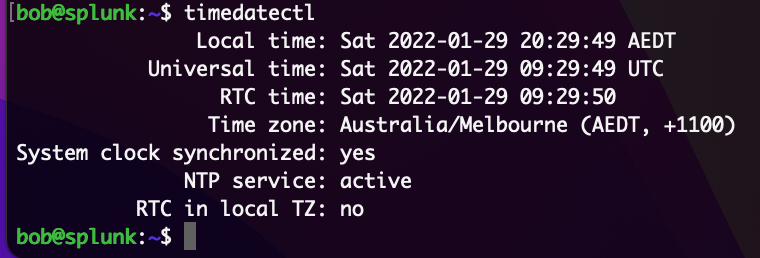
Ensure you are in the correct time zone
Another crucial thing is to set the correct time zone in both the Pi Hole (Raspberry Pi) and Splunk Server. In the past these systems have defaulted to Greenwich Mean Time (maybe the systems know I am English). At any rate this will provide incorrect data to Splunk and it will be displayed accordingly.
To check the timezone of your Ubuntu based system type the following command:
timedatectl
A sample output would look like this:
           Local time: Wed 2020-05-06 19:33:20 UTC
       Universal time: Wed 2020-05-06 19:33:20 UTC
             RTC time: Wed 2020-05-06 19:33:22
            Time zone: UTC (UTC, +0000)
System clock synchronized: yes
NTP service: active
RTC in local TZ: no
To list all available time zones type the following:
timedatectl list-timezones
Once you identify which time zone is accurate to your location, run the following command as sudo user:
sudo timedatectl set-timezone Australia/Melbourne
Here is what you should get:
Adjust accordingly to where you are located.
Configure Splunk Indexes
Login to Splunk Web
Navigate to Settings
Under the section DATA select Indexes

Click on New Index in the upper right-hand corner

Provide an index name of “dns”. The other default settings should be okay for this setup

And click ‘save’.
Once done you will need to complete some basic configuration within Splunk:
Configuring Pi Hole DNS Add-on

Create a new input (source of data)

The API Key can be found in the web admin interface of the Pi Hole:

Check the update details option, leave settings as is:

Install Splunk Technical Add-ons and Apps
Login to your splunk web instance
Install Splunk Common Information Model (CIM)
Login to Splunk Web
Depending on where you are in the GUI, either click the gearbox next to Apps OR use the App Drop down and select Manage Apps


Choose find more apps
Search for CIM and choose Splunk Common Information Model (CIM)

If prompted, enter your credentials for the Splunk website, and continue with installation.
Install Force Directed App for Splunk
Login to Splunk Web
Depending on where you are in the GUI, either click the gearbox next to Apps OR use the App Drop down and select Manage Apps


Click on find more apps
Search for “Force Directed”
Install the Force Directed App for Splunk

If prompted, enter your credentials for the Splunk website, and continue with installation.
Configure Receiving Port
Go to settings->API/Web interface then copy and paste the API key.
- Create Input
- Navigate to the settings tab
- Click “Forwarding and receiving”

Configure the receiving data section:


Installing Splunk Universal forwarder for Raspberry Pi
We’re almost there! We have configured our Pi Hole, we have installed a Splunk Server and configured it. Now we just need to install a Universal Forwarder App onto the Raspberry Pi itself.
Install the Splunk Universal Forwarder on the RPI (ARMv6) – this is the software used to forward data into Splunk:
Link to Download: https://www.splunk.com/en_us/download/universal-forwarder.html
(hint, once you start the download you can view a wget link on the right – you can copy this and download directly onto your RPI)
Download Splunk Universal Forwarder from the website (to be installed in the Raspberry Pi)

Use the provided command and chose the forwarder for ARM Linux (Raspberry Pi runs on ARM architecture). Login to your Raspberry Pi and enter the following commands:
wget -O splunkforwarder-8.1.5-9c0c082e4596-Linux-arm.tgz ‘https://download.splunk.com/products/universalforwarder/releases/8.1.5/linux/splunkforwarder-8.1.5-9c0c082e4596-Linux-arm.tgz’
tar xvzf splunkforwarder-8.1.5-9c0c082e4596-Linux-arm-manifest -C /o
Run sudo ./splunk start from $SPLUNK_HOME/bin
And this is what happens when you first start the universal forwarder

Hopefully, it should ask you to accept an EULA and set a username and password, if that works, you’re in!
There is a little bit more configuration needed, go to the following directory:
/opt/splunkforwarder/etc/system/local
find and edit the following file:
sudo nano outputs.conf
Add the line: server=IP address of Splunk Server:Port number 9997

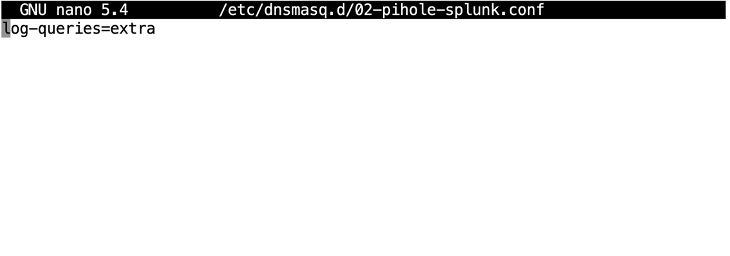
Then configure Pi Hole For High Quality Logging:
Use the following command:
sudo nano /etc/dnsmasq.d/02-pihole-splunk.conf
Add following to the configuration file. Then save and close:
log-queries=extra
SSH into to your Pi-hole
Update the inputs.conf file
In this instance it would be located in /opt/splunkforwarder/etc/apps/search/default
sudo nano /opt/splunkforwarder/etc/apps/search/default/inputs.conf
Paste the following into the text editor
| #inputs.conf [monitor:///var/log/pihole.log] disabled = 0 sourcetype = pihole #optionally specify an index, if configured. index = dns [monitor:///var/log/pihole-FTL.log] disabled = 0 sourcetype = pihole:ftl #optionally specify an index, if configured. index = dns |
restart the forwarder:
splunk [start|stop|restart]
Then enter the following commands:
restart pi-hole
pihole restartdns
Splunk and the Pi Hole DNS App
Log on to the Splunk Server:
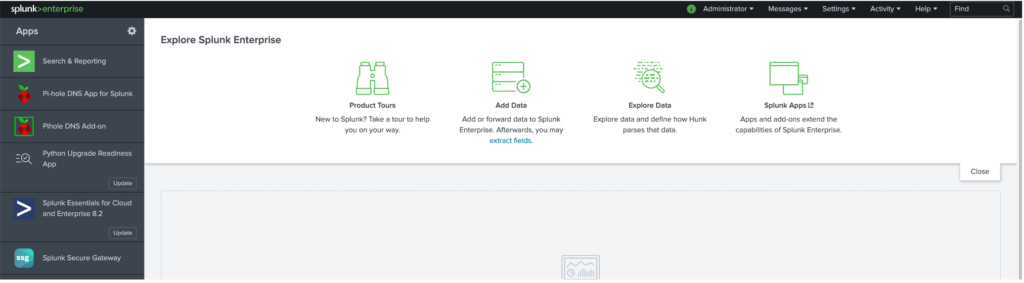
Open the Pi Hole App:

Success! The data is being sent over from the Pi Hole to the Splunk Server. You can add more clients to the Pi Hole and add more domains to the blocklists.
The next article discusses the effect of the Pi Hole on the browsing experience.